Hi.
Here's the deal: Luppp has been brought back to life. Not only same code is being re-used, but other projects have joined forces and now co-exist with Luppp.
This makes all the features from the other projects easier to implement in Luppp, like looping a .wav file, like processing automation data, providing LADSPA plugins.. :-)
The front-end needs work dratically, its basically just an OSC & terminal application atm. But that's all gonna change. Plans are made to scrap the "internal OSC" mode, in favour of being able to access the waveform data etc in the GUI thread. Nessisary evil for a nice program. Oh well.
Also the GUI will be totally reworked from 0, just like the engine was. This will provide more stable & maintainable code, as what I wrote a couple of years ago isn't quite what most would concider acceptable.. :-P
Will post here once there's new features... -Harry
Showing posts with label GTKmm GUI programming. Show all posts
Showing posts with label GTKmm GUI programming. Show all posts
Saturday, December 18, 2010
Wednesday, July 28, 2010
Announce: PreHear *listen* to your samples
Hey all,
Its been a while, and I've been busy enough learning vala, writing
.vapi "binding" files, and just learning a bit more C in general.
But now for the fruit, a small handy little audio sample auditioner.
Currently it supports the JACK audio connection kit for audio output,
and will load any .wav, .au, or .aiff file you throw at it.
There are options as to play the whole file (play button),
play starting from position X (Play X), and to play from
position X, a duration of Y (Play X Y).
See attached screenshot for a "visual explaination".. and note the arrows
are a little sloppy.. I know! :-)
Getty link here: Link to Source Code download
Or get a built tarball here: Link to download
Cheers, -Harry
PS: Screenshot

Thursday, December 3, 2009
Tut 5: Callbacks with GTKmm
Hey!
So far, we've told the computer what to do, and then let it do it.
But what if we want it to execute some code ONLY when we do something
first? The best solution to this "problem" is something called Callback Functions.
We've actually already used callbacks before. Remember back in Tut 3,
we had 'jack_set_process_callback ();' ? There you go.
GTKmm uses the SigC++ library to handle its callbacks. This means that when the user clicks a button, sigc++ comes into action, and "sends" a signal called signal_clicked(). Then we can connect this signal to a function. Eg: when we recieve signal_clicked(), we tell the program to do function X.
Download the code for a working example, and maybe read the GTKmm book if you want to know more about signals.

Sunday, November 29, 2009
Tut 3: JACK Audio Connections!
Hey all,
Today its Audio Input time. Lets get to it:
1. Start a new project, I named mine JackGtkmm
2. Download my main.cpp file from here
Link the jack library, and the Gtkmm library to your project.
Click compile, should work without any bother..?!
The code should be ok, read through it, i can update it if theres
any criticism, or I should explain something better.
There's a couple of small exercises in the comments, or hints as to
how to improve the code. There's one way to learn programming,
learn by doing. Enjoy!
PS: The current version only connects the Left input and output ports automatically. See if you can get the right ones to "Auto-Connect" too.

Monday, November 2, 2009
Tut 2: Simple Gtkmm Window
Ok guys, I'm jumping straight to the chase, no program design tutorial, no "basics" of anything, were going to display a simple "hi" box.
GTK+ is a GUI toolkit. That means you build Graphical User Interfaces with it, and that's what were going to do. If you don't understand a certain aspect of this code/tutorial, please let me know so I can improve the content.
I'm assuming that you can set up the enviroment as per the "Hello World" tutorial. Then put that code into your main.cpp file. If you try running now, MonoDevelop will probably tell you this:
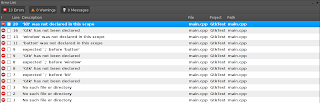
Why does this not work? That has to do with how C++ works. When we compile code, we transform the code into something called an Object file. These files end in .o These .o files are then "linked" with libraries that we've used, to create an "executable" which we can then run on the computer.
What's going wrong here, is that we have used GTKmm in our code, (see the #includes), but we havent told MonoDevelop that we want it to link to GTKmm for our exectuable. So that's all we've got to do.
On the left, there should be "pane" showing this:
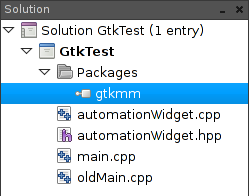
If that's not there on your left, make sure that the "solution" tab is selected (bottom left).

Now right click on the "Packages" item (as per 2 pictures up), select "Edit Packages" from the right-click menu, and a popup box should appear:
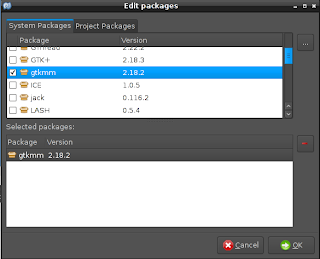
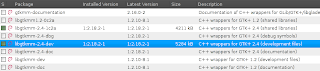
If the "gtkmm" item isnt in your list, that's ok! That means you don't have the gtkmm-dev packages installed. Lets go to Synaptic (or your favorite package manager), and search for GTKmm. The following are my results, if yours are a bit different that's ok. If gtkmm-dev isnt in that list either, get in contact with somebody that knows your setup or email me!
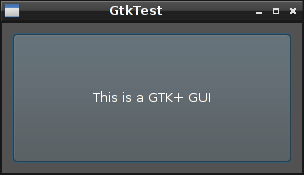
Just install that package (& its dependencies), go back to MonoDevelop, try to add the package and this time it should be there. Now click Debug in MonoDevelop (or hit F5), and it should pop up a little box with a button in the middle..! Kinda like this one:
Now the colours might be different, it might have a different name on top, but it should run!
Any problems, please comment! Congrats on your Gtkmm GUI app!
Till next post, -Harry
GTK+ is a GUI toolkit. That means you build Graphical User Interfaces with it, and that's what were going to do. If you don't understand a certain aspect of this code/tutorial, please let me know so I can improve the content.
#include <gtkmm/main.h>
#include <gtkmm/window.h>
#include <gtkmm/button.h>

int main (int argc,char *argv[])
{
Gtk::Main kit(argc, argv);
Gtk::Window window;
Gtk::Button button;

button.set_label("This is a GTK+ GUI");

window.add(button);
window.set_border_width(10);
window.set_default_size(300,150);
window.set_position(Gtk::WIN_POS_CENTER);

window.show_all();

kit.run(window);

return 0;
}
I'm assuming that you can set up the enviroment as per the "Hello World" tutorial. Then put that code into your main.cpp file. If you try running now, MonoDevelop will probably tell you this:

Why does this not work? That has to do with how C++ works. When we compile code, we transform the code into something called an Object file. These files end in .o These .o files are then "linked" with libraries that we've used, to create an "executable" which we can then run on the computer.
What's going wrong here, is that we have used GTKmm in our code, (see the #includes), but we havent told MonoDevelop that we want it to link to GTKmm for our exectuable. So that's all we've got to do.
On the left, there should be "pane" showing this:

If that's not there on your left, make sure that the "solution" tab is selected (bottom left).

Now right click on the "Packages" item (as per 2 pictures up), select "Edit Packages" from the right-click menu, and a popup box should appear:

If the "gtkmm" item isnt in your list, that's ok! That means you don't have the gtkmm-dev packages installed. Lets go to Synaptic (or your favorite package manager), and search for GTKmm. The following are my results, if yours are a bit different that's ok. If gtkmm-dev isnt in that list either, get in contact with somebody that knows your setup or email me!

Just install that package (& its dependencies), go back to MonoDevelop, try to add the package and this time it should be there. Now click Debug in MonoDevelop (or hit F5), and it should pop up a little box with a button in the middle..! Kinda like this one:

Now the colours might be different, it might have a different name on top, but it should run!
Any problems, please comment! Congrats on your Gtkmm GUI app!
Till next post, -Harry
Subscribe to:
Posts (Atom)